9주차 실습(2)-Retrofit 로직 구현
목차
0. api 명세서 테스트
1. 서비스 클래스 만들기- AuthService.kt
1-1. authService 객체 만들기
1-2. 실행함수
❗️잠깐! 파일정리 겸 중간정리
2. Login Activity , 회원가입 Activity 만들어주기
3. xml 수정
4. manifest 수정
5. 응답 결과로 UI 그리기
5-1. 뷰 담당 인터페이스 SignUpView
5-1-1. 파일 만들기
5-1-2. 인터페이스에 함수 선언
5-2. AuthService.kt 에서 인터페이스 로직 구현
5-2-1. AuthService에서 인터페이스를 상속받는 함수를 만들어준다.
5-2-2. 로딩중 fun SignUpLoading
5-2-3. 로그인 성공시 fun SignUpSuccess/로그인 실패시 fun SignUpFailure()
6. 액티비티에서 받아온 정보를 AuthService.kt 에 연결
6-1. SignupActivity 수정 : 바인딩해온 정보를 AuthService의 로직에 전달할 수 있도록
6-2. SignupActivity에서 인터페이스 메서드 실제 구현
6-2-1. fun SignUpLoading 구현
6-2-2. SignUpSuccess구현
6-2-3. fun SignUpFailure 구현
0. api 명세서 테스트
api 명세서를 테스트해볼 수 있다.
(실제로 api가 잘 작동되는지)
postman 이라는 어플 사용해보자
명세서에 적힌 url과 요청과 응답대로 그대로 넣어보면
(body에서는 raw 와 JSON 형식을 선택해주기)
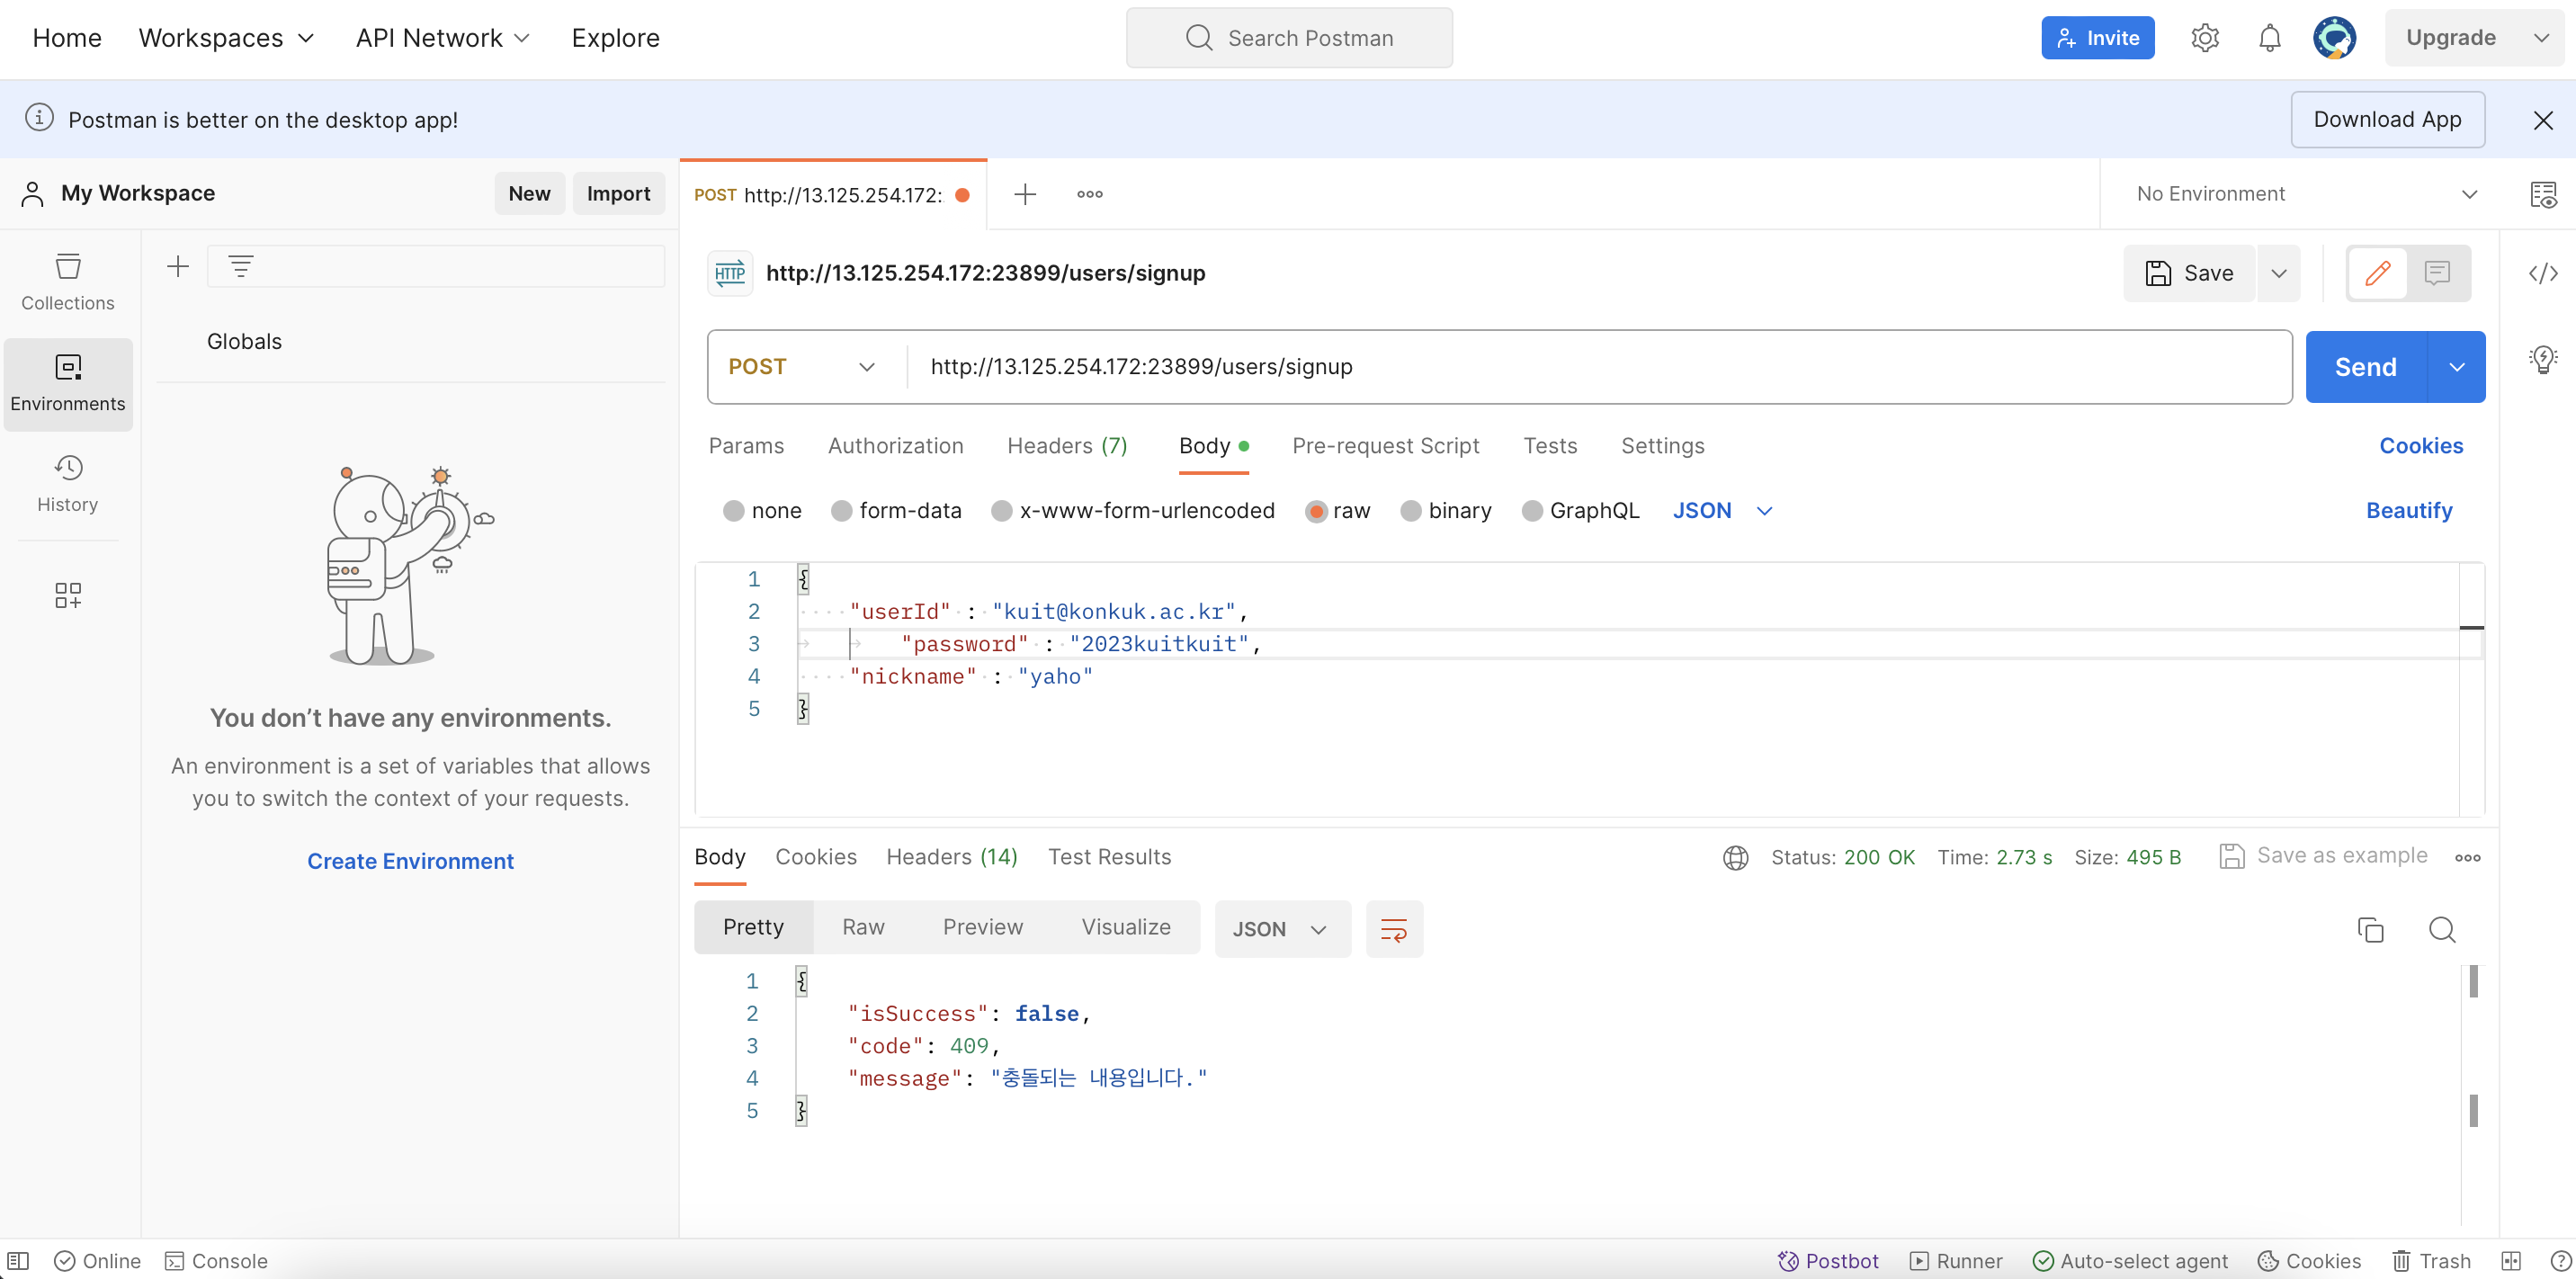
응답이 잘 오는 것을 알 수 있다.
뭔가 잘 안됐을때 서버에서 구현이 안된건지 내가 구현을 잘못한건지 알아볼 수 있다.
실제로 postman으로 보낸 응답도 실제로 db에 저장이 되기 때문에 중복회원과 같은 기존 데이터와 비교하는 작업도 postman에서 테스트할 수 있다.
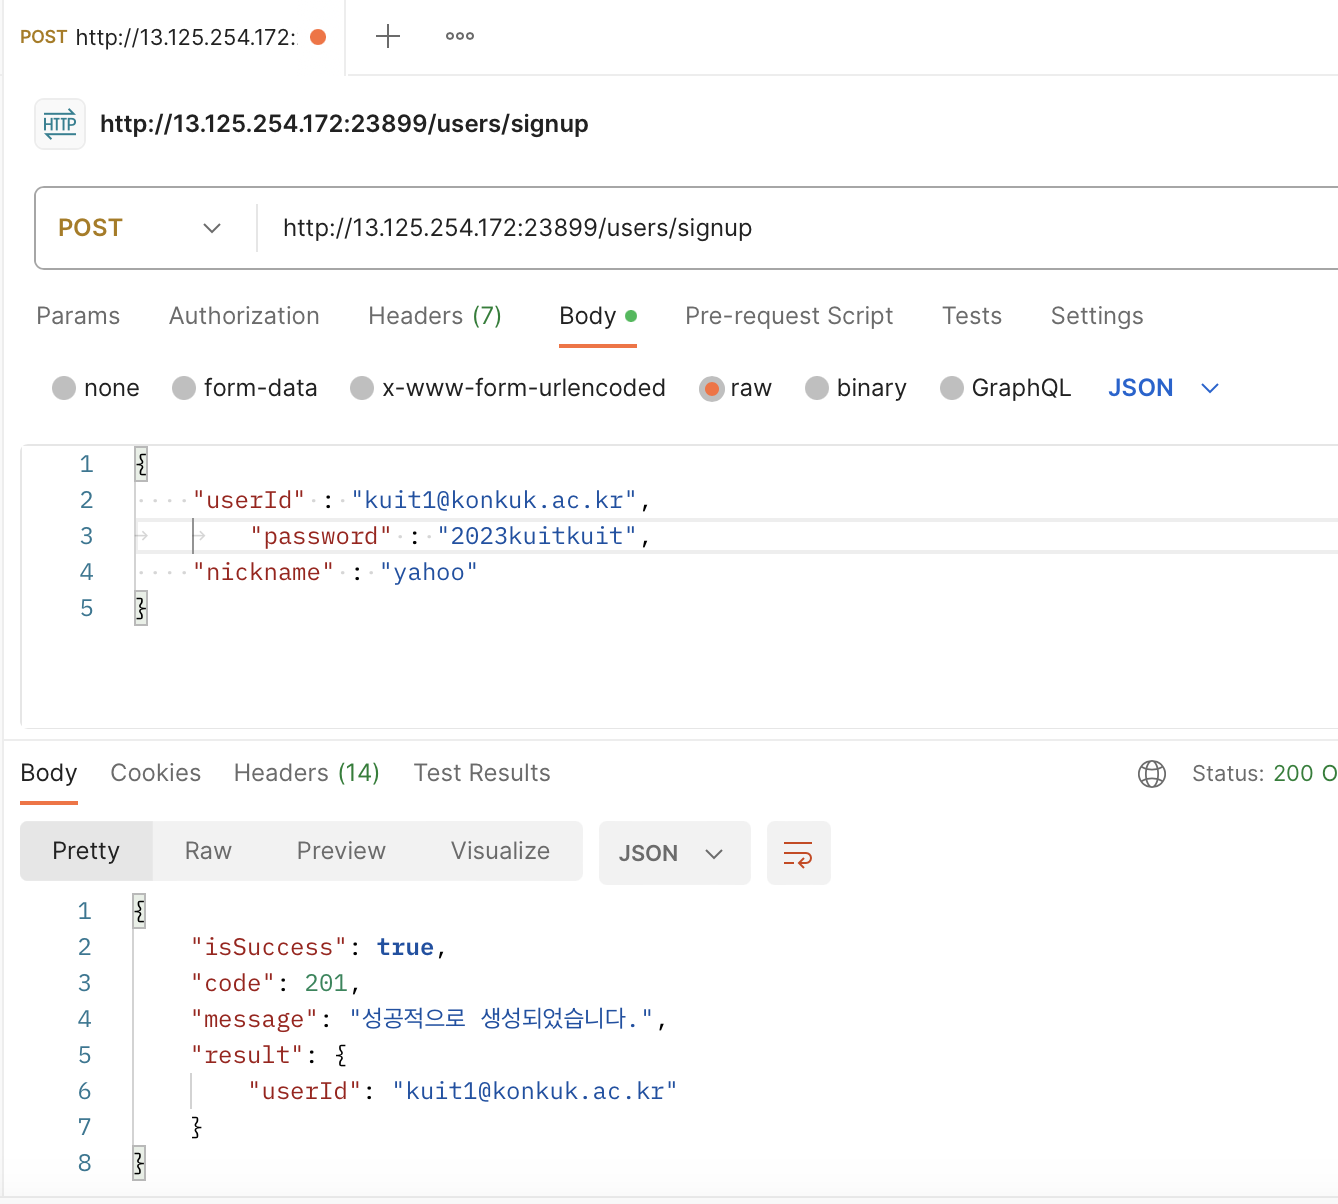
강의와 다른 데이터를 만들면 생성까지 잘 된다.
지난 글에서는 인터페이스까지 완성했고 이번에는 실제 구현로직을 짜볼 것이다.
@POST("users/signup")
fun signup(
@Body request: SignUpRequest
) : Call<BaseResponse<SignUpResponse>>
}
현재 retrofit 인터페이스에
요청방식(@post), 내부에 포함할 데이터(@body) 그리고 반환받을 타입(Call<BaseResponse<SignUpResponse>>)을 전부 명시해줬었다.
데이터를 까고 주고받는 등의 것은 이제 라이브러리에서 알아서 해줄거고 우리는 '결과'를 반환받았을때 어떤 행동을 실행할지를 만들 것이다.
1. 서비스 클래스 만들기- AuthService.kt
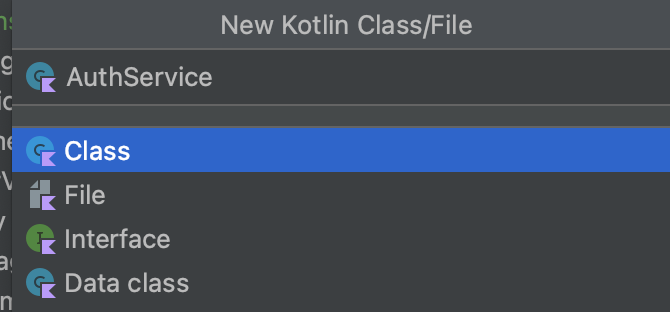
AuthService라는 이름의 클래스 파일을 만들어주자(api 관련 파일들은 remote 안에 만들어주기로 했었음)
Retrofit 객체에 의해 요청을 하고 응답을 받을 서비스 클래스이다.
1-1. authService 객체 만들기
지난 글에서 application class에서 retrofit 객체를 만들어서 초기화해줬었다.
ApplicationClass에서 retrofit 객체를 builder를 통해 만들긴 했었는데
AuthService에서는 다음과 같이 그 객체에 retrofit interface 의 함수정보를 넣어줘야 한다.
private val authService = ApplicationClass.retrofit.create(RetrofitInterface::class.java)
그래서 RetrofitInterface에 담겨있는, 데이터를 어떤식으로 호출할 것인지에 관한 정보와 함께 create()문으로 정보를 retrofit 객체에 삽입해줬다.
왜 retrofit 객체를 ApplicationClass, 특히 companion object 안에 만드냐면,
어플을 사용하면 지속적으로 요청이 자잘하게 발생하는데,
// ApplicationClass.kt 파일
package com.example.carrotmarket
import android.app.Application
import retrofit2.Retrofit
import retrofit2.Retrofit.Builder
import retrofit2.converter.gson.GsonConverterFactory
class ApplicationClass : Application() {
companion object{
const val DEV_URL : String = "http://13.125.254.172:23899"
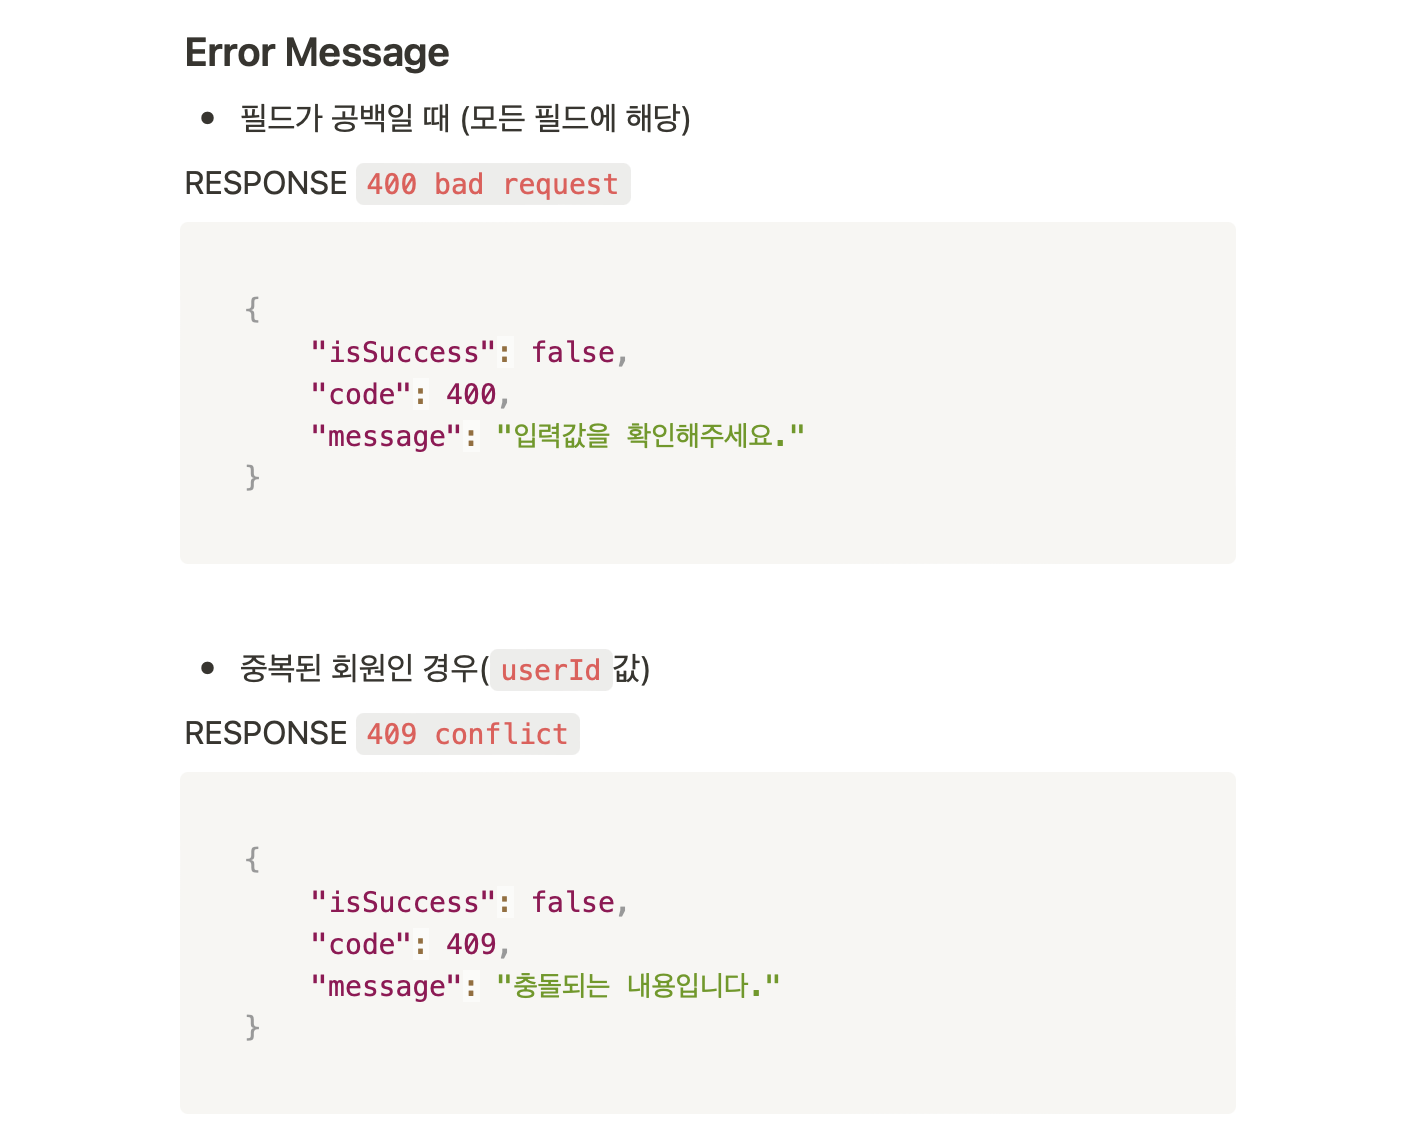
const val PROD_URL : String = "http://kuit_prod_url"
const val BASE_URL : String = DEV_URL
lateinit var retrofit : Retrofit
}
override fun onCreate() {
super.onCreate()
retrofit = Builder()
.baseUrl(BASE_URL)
.addConverterFactory(GsonConverterFactory.create())
.build()
}
}클릭을 하는 등의 이벤트가 발생할 때마다 이런식으로 builder를 통해 객체를 생성하면 리소스도 많이 사용되고 자원이 낭비된다.
그래서 싱글톤 패턴처럼
retrofit을 전역변수(companion object)로 application class에 초기화해서 살려둔 다음, 다른곳에서도 그걸 계속 가져와서 사용하는 것이다
그래서 현재 RetrofitInterface를 주입받은 retrofit 서비스객체를 생성했고
이제 실행함수를 만들자.
1-2. 실행함수
❗️잠깐! 파일정리 겸 중간정리
retrofit을 이용하려면 builder, retrofit 정의하는 인터페이스, 데이터 정의하는 data class 이렇게 세가지가 필요하다.
1. ApplicationClass.kt
: Application을 상속받음으로써 전역변수(companion object, 여기서는 개발/배포 url과 retrofit을 전역변수로 설정) 등을 관리. 그리고 이 파일의 onCreate 문(앱 실행할때 가장~ 먼저 실행됨. application class니까.)에 retrofit의 builder를 만들었다.
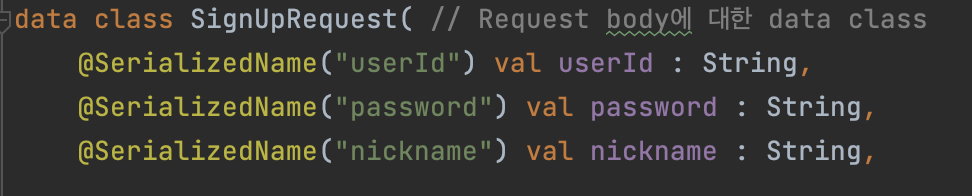
2. AuthEntity.kt (데이터 클래스)
api 명세서의 body에 따라 각 데이터에 대한 변수를 선언해주고,
그 앞에는 실제 그 데이터를 요청할 때 사용될 키값을 @Serialized 어노테이션으로 명시해준다.
ex.
@SerializedName("userId") val userId : String
2-1. BaseResponse.kt
api 명세서를 확인해보면, 성공시와 실패시의 response에서 같은 키의 데이터들이 있기 때문에 그부분은 따로 만들어준다.
❓ 하나의 응답을 두가지 파일에서 받는건가? AuthEntity.kt랑 BaseResponse<T>??
여기서 isSuccess, code, message 이렇게 세가지 공통 키값들은 그대로 받는데, 제너릭<T>를 사용해서 응답이 성공했을 시에 result 데이터를 받는다.
AuthEntity에서는 SignUpRequest 라는 데이터클래스와, SignUpResponse라는 데이터 클래스가 있는데
Response에는 userId라는 변수 하나만 로직으로 처리할 것이기 때문에 userId만 정의되어있다.
레트로핏은 어노테이션과 인터페이스 기반으로 동작하는 라이브러리이기 때문에,
인터페이스에서 아까 봤던 API 명세서에 대한 내용을 정의해줘야 한다.
3. RetrofitInterface.kt
@POST("users/signup")
fun signup(
@Body request: SignUpRequest
) : Call<BaseResponse<SignUpResponse>>
인터페이스에는 @Body 어노테이션을 이용해서 request라는 변수를 아까 정의한 데이터클래스의 SignUpResponse 형식으로 받는다.
근데 이때 함수의 반환형을 Call 객체(cf. Response 방식과 비교)로 받는다.
성공/실패에 따라 달라지는 부분, 즉 userId를 담은 SignUpResponse 데이터 타입을 뼈대인 BaseResponse에 넣은 것을 Call 객체의 인자로 받는다.
다시 실행함수 만들기로 돌아와서,
@Body request: SignUpRequest
RetrofitInterface를 보면 @Body로 SignUpRequest가 들어간다.
데이터 클래스 파일인 AuthEntity.kt 들어가 보면
@SerializedName("userId") val userId : String,
@SerializedName("password") val password : String,
@SerializedName("nickname") val nickname : String)
SignUpRequest는 정보가 세개가 필요하다.
val request = SignUpRequest(id, pw, name)
authService.signup(request).enqueue()
}
AuthService.kt에서는 SignUpRequest에 필요한 정보 세개를 다 받아서 request를 만들어주자
이때 authService는 객체에 RetrofitInterface를 주입해놔서 그 안의 fun signup 함수도 쓸수있게 된다.
그럼 그 fun signup 안에 body로써 SignUpRequest가 들어가야 하므로 SignUpRequest 타입인 request객체를 인자로 전달해준다.
그리고 그 옆에 .enqueue()를 붙여주자
enqueue 방식은 자동으로 비동기 통신 로직이 구현된다. 여기서 코루틴이나 쓰레드를 사용하지 않아도 비동기로 구현된다.
enqueue 안에는 콜백 객체가 들어가야 하는데, 이를 익명 함수로써 생성해주겠다. retrofit 객체로 작성된 콜백 객체를 찾아서 넣어주자
안보이면 직접 추가해준다.

이런 식으로 콜백을 지정해주는 이유는
RetrofitInterface의 signup 메소드에서 이미
이런 식으로 response를 받겠다고 지정해놨기 때문이다.
signup>> 옆에 중괄호{} 넣어주면 object 아래에 빨간줄뜨면서 alt+enter 하면

이렇게 implement members가 뜨므로 해준다.

콜백 객체에 대해 overriding해서 member들을 구현해주자.
그러면 onResponse, onFailure 이렇게 http 통신의 성공/실패 여부에 따라 호출되는 두가지 함수가 생성된다
onFailure에는 디버깅을 위한 로그만 찍어주자
// http 통신 실패했을때 호출됨
Log.d("SignUp Failed", t.toString())
}
onResponse에는 아래와 같이 call 객체와 response 객체가 이미 받아져 있다
call: Call<BaseResponse<SignUpResponse>>,
response: Response<BaseResponse<SignUpResponse>>
) {
Log.d("SignUp Response", response.toString())
}
만약 enqueue가 아니라 execute 방식으로 구현을 하면 onResponse/onFailure 방식으로 반환되는 게 아니라 response 객체만 반환된다.
enqueue가 더 이해하기는 쉬우므로 먼저 해보자
onResponse에도 로그만 일단 만들어주자
일단 이렇게 결과에 따라 어떤 행동을 실행할지에 대해 정의해줬다.
2. Login Activity , 회원가입 Activity 만들어주기
// 필요한 xml은 알아서 만들기
package com.example.carrotmarket

import android.content.Intent
import androidx.appcompat.app.AppCompatActivity
import android.os.Bundle
import com.example.carrotmarket.databinding.ActivityLoginBinding

class LoginActivity : AppCompatActivity() {

    lateinit var binding: ActivityLoginBinding
    override fun onCreate(savedInstanceState: Bundle?) {
        super.onCreate(savedInstanceState)
        binding = ActivityLoginBinding.inflate(layoutInflater)
        setContentView(binding.root)

        binding.loginSignupBtn.setOnClickListener{ // 회원가입(signup)버튼 눌렀을 때
            val signupIntent = Intent(this, SignupActivity::class.java)
            startActivity(signupIntent) // 인텐트로 signup activity로 넘어가도록 함
        }
    }
}
package com.example.carrotmarket

import androidx.appcompat.app.AppCompatActivity
import android.os.Bundle
import com.example.carrotmarket.databinding.ActivitySignupBinding
import com.example.carrotmarket.remote.AuthService

class SignupActivity : AppCompatActivity() {

    lateinit var binding : ActivitySignupBinding
    override fun onCreate(savedInstanceState: Bundle?) {
        super.onCreate(savedInstanceState)
        binding = ActivitySignupBinding.inflate(layoutInflater)
        setContentView(binding.root)

        binding.signinBtn.setOnClickListener {
            val id = binding.signinIdEt.text.toString()
            val pw = binding.signinPwEt.text.toString()
            val name = binding.signinNameEt.text.toString()
            val authService = AuthService()
            authService.signUp(id, pw, name)
        }
    }
}
이렇게 두 액티비티를 만들어주면
<로그인 액티비티>
로그인/회원가입버튼 클릭->회원가입 액티비티로 이동
<회원가입 액티비티>
관련정보 입력->회원가입 버튼 클릭하면
관련 정보들을 .text.toString() 으로 파싱(원하는 데이터를 추출하여 가공하기 쉬운 상태로 바꾸는 것)해와서
AuthService 객체를 만들고, 그 안의 singup메서드를 호출해준다(with 필요한 인자들 전달한 상태).
참고로 AuthService의 signUp 메서드는 이렇게 생겼다.
class AuthService {
    private val authService = ApplicationClass.retrofit.create(RetrofitInterface::class.java)
    fun signUp(id: String, pw : String, name : String){
        val request = SignUpRequest(id, pw, name)
        authService.signup(request).enqueue(object : Callback<BaseResponse<SignUpResponse>>{
            override fun onResponse( // http 통신 성공했을때 호출됨
                call: Call<BaseResponse<SignUpResponse>>,
                response: Response<BaseResponse<SignUpResponse>>
            ) {
                Log.d("SignUp Response", response.toString())
            }
            override fun onFailure(call: Call<BaseResponse<SignUpResponse>>, t: Throwable) {
                // http 통신 실패했을때 호출됨
                Log.d("SignUp Failed", t.toString())
            }
        })
    }
}
id, pw, name 정보가 들어가는 순서
AuthService의 fun signUp
->그 안의 val request
->RetrofitInterface가 적용된 authService 객체
->RetrofitInterface의 fun signup의 @Body 정보로서 들어감
->fun signup의 반환으로 request 요청 객체(Call 객체)가 만들어짐
->그 객체가 enqueue를 통해 실제로 네트워크로 서버에 요청됨
3. xml 수정

로그인 버튼을 바인딩해오자.
// MyCarrotFragment.kt
package com.example.carrotmarket

import android.content.Intent
import android.os.Bundle
import android.view.LayoutInflater
import android.view.View
import android.view.ViewGroup
import androidx.fragment.app.Fragment
import com.example.carrotmarket.databinding.FragmentMyBinding

class MyCarrotFragment : Fragment() {
    lateinit var binding : FragmentMyBinding

    override fun onCreateView(
        inflater: LayoutInflater,
        container: ViewGroup?,
        savedInstanceState: Bundle?
    ): View? {
        binding = FragmentMyBinding.inflate(layoutInflater)

        binding.loginBtn.setOnClickListener {
            val loginIntent = Intent(requireContext(), LoginActivity::class.java)
            startActivity(loginIntent)
        }

        return binding.root
    }

}
바인딩해와서 인텐트로 화면전환 이벤트를 넣어주면 위와 같다.
근데 오류가 생긴다
그 이유인 즉슨 ApplicationClass를 만들고 Manifest 파일에 선언하지 않았기 때문이다.
4. Manifest 파일에 클래스 등록
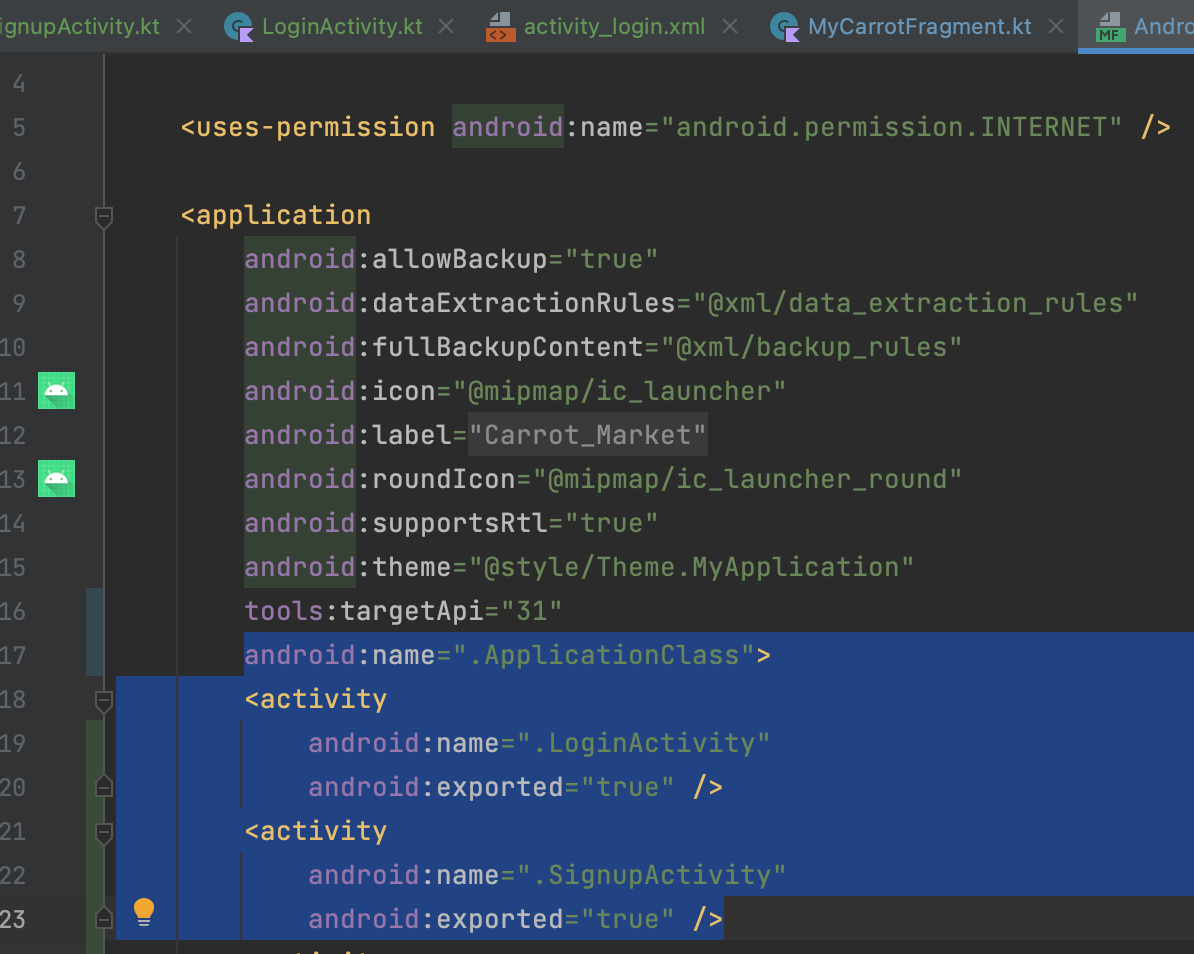
application 태그 안에
추가해주고
activity 태그 안에 있는 loginActivity와 signupActivity의 exported 설정을 true로 바꿔준다
아까 안만든 xml을 지금 만들면
// activity_login.xml 전체코드
<?xml version="1.0" encoding="utf-8"?>
<androidx.constraintlayout.widget.ConstraintLayout
    xmlns:android="http://schemas.android.com/apk/res/android"
    xmlns:app="http://schemas.android.com/apk/res-auto"
    xmlns:tools="http://schemas.android.com/tools"
    android:layout_width="match_parent"
    android:layout_height="match_parent"
    tools:context=".LoginActivity">

    <androidx.constraintlayout.widget.Guideline
        android:id="@+id/guide_line"
        android:layout_width="match_parent"
        android:layout_height="match_parent"
        android:orientation="vertical"
        app:layout_constraintStart_toStartOf="parent"
        app:layout_constraintEnd_toEndOf="parent"
        app:layout_constraintTop_toTopOf="parent"
        app:layout_constraintBottom_toBottomOf="parent"
        app:layout_constraintGuide_begin="30dp"
        app:layout_constraintGuide_end="30dp"/>

    <TextView
        android:id="@+id/login_tv"
        android:layout_width="wrap_content"
        android:layout_height="wrap_content"
        android:text="로그인"
        android:fontFamily="@font/interbold"
        android:textSize="25sp"
        app:layout_constraintStart_toStartOf="parent"
        app:layout_constraintEnd_toEndOf="parent"
        app:layout_constraintTop_toTopOf="parent"
        android:layout_marginTop="20dp" />

    <TextView
        android:id="@+id/login_id_tv"
        android:layout_width="wrap_content"
        android:layout_height="wrap_content"
        android:text="ID"
        android:textSize="20sp"
        app:layout_constraintStart_toStartOf="@id/guide_line"
        app:layout_constraintTop_toTopOf="parent"
        android:layout_marginTop="150dp" />

    <EditText
        android:id="@+id/login_id_et"
        android:layout_width="340dp"
        android:layout_height="wrap_content"
        app:layout_constraintStart_toStartOf="@id/guide_line"
        app:layout_constraintTop_toBottomOf="@id/login_id_tv"
        android:backgroundTint="@color/black"
        android:layout_marginTop="5dp" />

    <TextView
        android:id="@+id/login_pw_tv"
        android:layout_width="wrap_content"
        android:layout_height="wrap_content"
        android:text="Password"
        android:textSize="20sp"
        app:layout_constraintStart_toStartOf="@id/guide_line"
        app:layout_constraintTop_toTopOf="parent"
        android:layout_marginTop="250dp" />

    <EditText
        android:id="@+id/login_pw_et"
        android:layout_width="340dp"
        android:layout_height="wrap_content"
        app:layout_constraintStart_toStartOf="@id/guide_line"
        app:layout_constraintTop_toBottomOf="@id/login_pw_tv"
        android:backgroundTint="@color/black"
        android:layout_marginTop="5dp" />

    <TextView
        android:id="@+id/no_id_tv"
        android:layout_width="wrap_content"
        android:layout_height="wrap_content"
        android:textSize="15sp"
        android:text="아이디가 없으신가요?"
        app:layout_constraintEnd_toEndOf="@id/login_pw_et"
        app:layout_constraintTop_toBottomOf="@id/login_pw_et"
        android:layout_marginTop="10dp" />

    <TextView
        android:id="@+id/login_signup_btn"
        android:layout_width="wrap_content"
        android:layout_height="wrap_content"
        android:text="회원가입"
        android:textSize="15sp"
        app:layout_constraintEnd_toEndOf="@id/no_id_tv"
        app:layout_constraintTop_toBottomOf="@id/no_id_tv"
        android:textColor="#446999" />

</androidx.constraintlayout.widget.ConstraintLayout>
// activity_signup.xml
<?xml version="1.0" encoding="utf-8"?>
<androidx.constraintlayout.widget.ConstraintLayout xmlns:android="http://schemas.android.com/apk/res/android"
android:layout_width="match_parent"
android:layout_height="match_parent"
xmlns:app="http://schemas.android.com/apk/res-auto">
<TextView
android:layout_width="wrap_content"
android:layout_height="wrap_content"
android:text="회원가입"
android:textSize="25dp"
app:layout_constraintStart_toStartOf="parent"
app:layout_constraintEnd_toEndOf="parent"
app:layout_constraintTop_toTopOf="parent"
android:layout_marginTop="30dp"
android:fontFamily="@font/interbold" />
<androidx.constraintlayout.widget.Guideline
android:id="@+id/guide_line"
android:layout_width="wrap_content"
android:layout_height="wrap_content"
android:orientation="vertical"
app:layout_constraintGuide_begin="30dp" />
<TextView
android:id="@+id/signin_id_tv"
android:layout_width="wrap_content"
android:layout_height="wrap_content"
android:text="ID로 사용할 이메일을 입력하세요"
android:textSize="15sp"
android:textColor="@color/gray_500"
app:layout_constraintStart_toStartOf="@id/guide_line"
app:layout_constraintTop_toTopOf="parent"
android:layout_marginTop="150dp"/>
<EditText
android:id="@+id/signin_id_et"
android:layout_width="340dp"
android:layout_height="wrap_content"
app:layout_constraintStart_toStartOf="@id/guide_line"
app:layout_constraintTop_toBottomOf="@id/signin_id_tv" />
<TextView
android:id="@+id/signin_pw_tv"
android:layout_width="wrap_content"
android:layout_height="wrap_content"
android:text="비밀번호를 입력하세요"
android:textSize="15sp"
android:textColor="@color/gray_500"
app:layout_constraintStart_toStartOf="@id/guide_line"
app:layout_constraintTop_toBottomOf="@id/signin_id_et"
android:layout_marginTop="30dp"/>
<EditText
android:id="@+id/signin_pw_et"
android:layout_width="340dp"
android:layout_height="wrap_content"
app:layout_constraintStart_toStartOf="@id/guide_line"
app:layout_constraintTop_toBottomOf="@id/signin_pw_tv"
/>
<TextView
android:id="@+id/signin_name_tv"
android:layout_width="wrap_content"
android:layout_height="wrap_content"
android:text="사용할 닉네임을 입력하세요"
android:textSize="15sp"
android:textColor="@color/gray_500"
app:layout_constraintStart_toStartOf="@id/guide_line"
app:layout_constraintTop_toBottomOf="@id/signin_pw_et"
android:layout_marginTop="30dp"/>
<EditText
android:id="@+id/signin_name_et"
android:layout_width="340dp"
android:layout_height="wrap_content"
app:layout_constraintStart_toStartOf="@id/guide_line"
app:layout_constraintTop_toBottomOf="@id/signin_name_tv"
/>
<Button
android:id="@+id/signinBtn"
android:layout_width="wrap_content"
android:layout_height="wrap_content"
app:layout_constraintEnd_toEndOf="@id/signin_name_et"
app:layout_constraintTop_toBottomOf="@id/signin_name_et"
android:layout_marginTop="10dp"
android:text="회원가입" />
</androidx.constraintlayout.widget.ConstraintLayout>위와 같다.
근데 실행해보면 안된다.
2023-11-24 21:28:42.270 30182-30182 SignUp Failed com.example.carrotmarket D java.net.UnknownServiceException: CLEARTEXT communication to 13.125.254.172 not permitted by network security policyip주소가 정책상 허용되지 않는다고 한다.
http 주소로는 서버를 구축할 수 없게 만들어놨다 https만 가능하다
그치만 ip는 정해진 ip를 써야해서 이번만 http를 허용해주는 코드를 사용해보자.
4. manifest 수정
아까 applicationClass 를 등록해줬던 그 줄 아래에
이런 설정을 추가해준다.
이제 http로 요청을 해줄 수 있다.
실행해보면

응답이 잘 온다.
response 부분을 다음과 같이 수정해주고 한번더 새로운 계정으로 출력해줬다.
override fun onResponse( // http 통신 성공했을때 호출됨
                call: Call<BaseResponse<SignUpResponse>>,
                response: Response<BaseResponse<SignUpResponse>>
            ) {
                val resp = response.body()
                Log.d("SignUp Response body", resp.toString())
                Log.d("SignUp Response", response.toString())
            }
결과는 다음과 같다.

이제 이 결과를 가져와서 activity의 ui를 변형시킬 차례이다.
먼저, 뷰를 담당하는 인터페이스를 만들어주자
5. 응답 결과로 UI 그리기
5-1. 뷰 담당 인터페이스 SignUpView
5-1-1. 파일 만들기
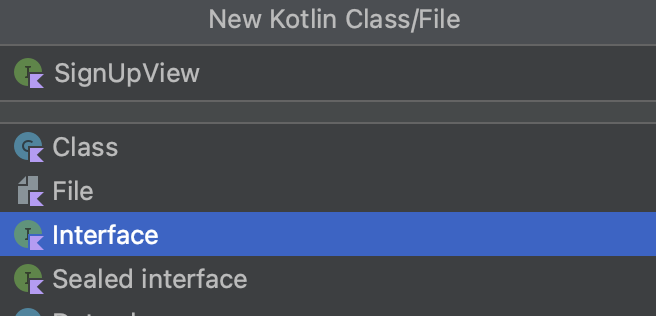
총 세가지의 뷰를 만들어 줄 것이다.
5-1-2. 인터페이스에 함수 선언
// SignUpView 인터페이스
package com.example.carrotmarket

interface SignUpView {
    fun SignUpLoading()
    fun SignUpSuccess()
    fun SignUpFailure()
}
이렇게 세가지 함수를 만들어주자
나중에 액티비티에서 이 액티비티를 상속받아 함수를 구현할 것이다.
동작을 정의하는 파일이었던 AuthServide.kt로 와서.
AuthService는 뷰를 갖고 있다가 fun signUp에서 함수들을 실행시킬 것이다.
5-2. AuthService.kt 에서 인터페이스 로직 구현
5-2-1. AuthService에서 인터페이스를 상속받는 함수를 만들어준다.
// AuthService.kt 에서
private lateinit var signUpView: SignUpView

fun setSignUpView(signUpView: SignUpView){
    this.signUpView = signUpView
}
this.signUpView = signUpView여기서 등호 왼쪽에 있는 this.signUpView는 현재의 AuthService 클래스 파일 안에서 선언한 변수이고
등호 오른쪽에 있는 signUpView는 함수가 파라미터로 받아온 signUpView: SignUpView이다.
이 함수의 역할은
외부(?)에서 함수를 실행시킴으로써 signUpView를 파라미터로 전달받아, 내부의 signUpView에 맵핑을 해주는 것이다.
5-2-2. 로딩중 fun SignUpLoading
보통 회원가입 버튼을 누르면 로딩중 표시가 뜬다.
이를 로그인 시에 작동할 함수인 fun signUp의 첫번째에 넣어준다.
signUpView.SignUpLoading()
5-2-3. 로그인 성공시 fun SignUpSuccess/로그인 실패시 fun SignUpFailure()
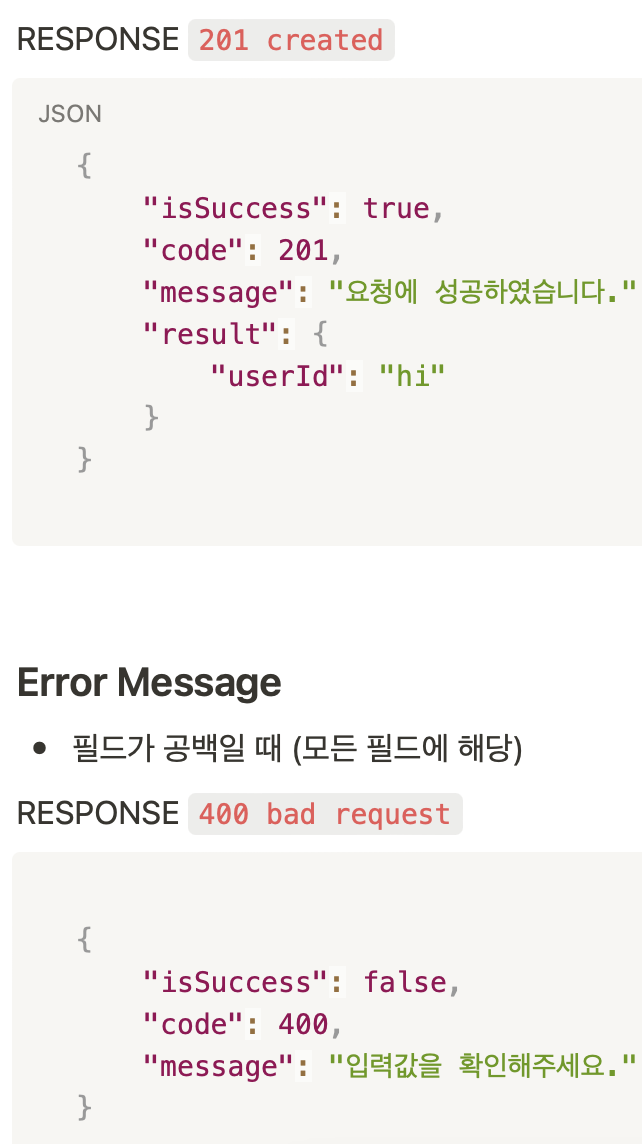
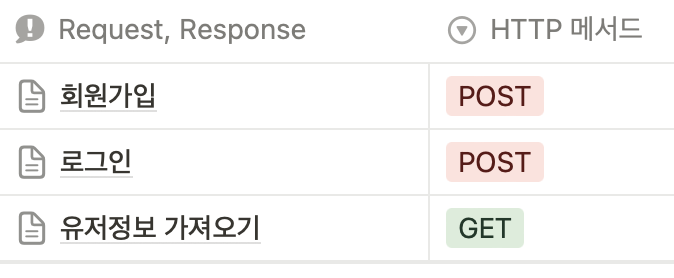
api 명세서 보면 응답에 따라 code 값이 다르므로
code 값에 따라 다른 뷰를 불러오기 위해
fun signUp안의 fun onResponse에서 when 을 사용해 준다.
override fun onResponse( // http 통신 성공했을때 호출됨
    call: Call<BaseResponse<SignUpResponse>>,
    response: Response<BaseResponse<SignUpResponse>>
) {
    val resp = response.body()
    Log.d("SignUp Response body", resp.toString())
    Log.d("SignUp Response", response.toString())
    when (resp!!.code) {
        201 -> signUpView.SignUpSuccess() // Response가 왔고 회원정보가 정상적으로 생성되었음
        else -> signUpView.SignUpFailure() // Response가 왔고 공백을 입력했거나 중복정보를 입력함
    }
}
6. 액티비티에서 받아온 정보를 AuthService.kt 에 연결
6-1. SignupActivity 수정 : 바인딩해온 정보를 AuthService의 로직에 전달할 수 있도록
이전에 SignupActivity(회원가입 액티비티) 작성한 것을 보면
// 수정전 SignupActivity.kt
package com.example.carrotmarket

import androidx.appcompat.app.AppCompatActivity
import android.os.Bundle
import android.util.Log
import com.example.carrotmarket.databinding.ActivitySignupBinding
import com.example.carrotmarket.remote.AuthService

class SignupActivity : AppCompatActivity() {

    lateinit var binding : ActivitySignupBinding
    override fun onCreate(savedInstanceState: Bundle?) {
        super.onCreate(savedInstanceState)
        binding = ActivitySignupBinding.inflate(layoutInflater)
        setContentView(binding.root)

        binding.signinBtn.setOnClickListener {
            val id = binding.signinIdEt.text.toString()
            val pw = binding.signinPwEt.text.toString()
            val name = binding.signinNameEt.text.toString()
            val authService = AuthService()
            authService.signUp(id, pw, name)
            Log.d("signin btn click", "signup activity 회원가입 버튼 클릭됨")
        }
    }
}
EditText View에 입력한 정보를 .toString으로 String으로 parsing(데이터 가공)해와서
authService 객체를 통해 AuthService의 signUp 메소드를 호출했었다.
여기서 추가적인 작업을 더해주자.
SignUpActivity가 SignUpView 인터페이스를 상속받도록 하자.(AuthService에 액티비티 정보를 파라미터로 넘겨줄 수 있도록)

그러면 인터페이스의 함수들을 override 하라고 뜨므로 alt+enter/option+enter 해서 implement 해주자
결과는 다음과 같다.
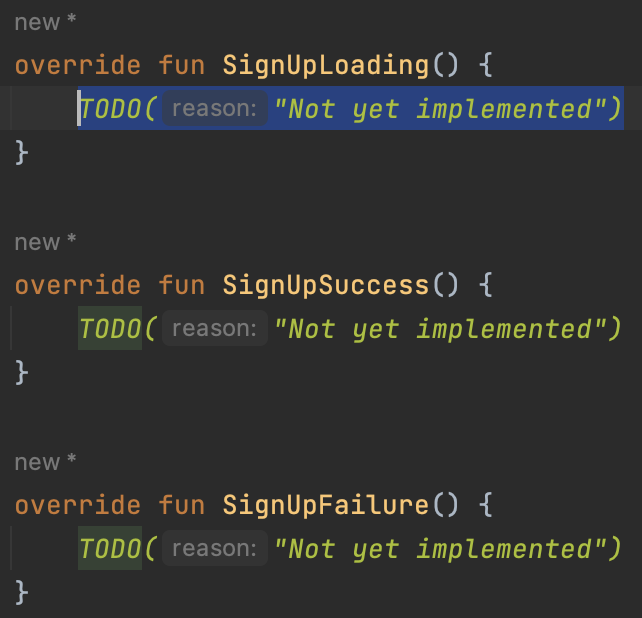
이제 이것들을 직접 구현해야 한다.
근데, AuthService.kt 클래스 파일의
lateinit var signUpView: SignUpView는 아직 초기화된 상태가 아니므로 해줘야 한다.
AuthService.kt에서 정의된 함수인
fun setSignUpView(signUpView: SignUpView){
    this.signUpView = signUpView
}
를
외부인 SignupActivity.kt 에서 세팅해줄 것이다(왜 여기서?)
// signupActivity에서
binding.signinBtn.setOnClickListener {
    val id = binding.signinIdEt.text.toString()
    val pw = binding.signinPwEt.text.toString()
    val name = binding.signinNameEt.text.toString()
    val authService = AuthService()
    authService.setSignUpView(this) // 추가된 구문
    authService.signUp(id, pw, name)
    Log.d("signin btn click", "signup activity 회원가입 버튼 클릭됨")
}
그니까 정보의 흐름은
SignupActivity에서 정보입력
->데이터바인딩해서 String으로 바꿈
->AuthService 상속받는 authService 객체를 만듦
->AuthService의
fun setSignUpView(signUpView: SignUpView){
    this.signUpView = signUpView
}
메소드를 호출해서 this(=SignupActivity)를 넣어준다
(아까 SignupActivity 자체를 SignUpView 인터페이스를 상속받게 했으므로 fun setSignUpView의 파라미터로 자신을 전달할 수 있게 된다.)
->그러면 AuthService.kt에서 private 변수인 signUpView와 파라미터로 넣어준 SignupActivity가 맵핑된다.
->그렇게 되면 AuthService.kt에서
fun signUp(id: String, pw: String, name: String) {
    val request = SignUpRequest(id, pw, name)
    signUpView.SignUpLoading()
    authService.signup(request).enqueue(object : Callback<BaseResponse<SignUpResponse>> {
        override fun onResponse( // http 통신 성공했을때 호출됨
            call: Call<BaseResponse<SignUpResponse>>,
            response: Response<BaseResponse<SignUpResponse>>
        ) {
            val resp = response.body()
            Log.d("SignUp Response body", resp.toString())
            Log.d("SignUp Response", response.toString())
            when (resp!!.code) {
                201 -> signUpView.SignUpSuccess()
                else -> signUpView.SignUpFailure()
            }
        }
        override fun onFailure(call: Call<BaseResponse<SignUpResponse>>, t: Throwable) {
            // http 통신 실패했을때 호출됨
            Log.d("SignUp Failed", id + pw + name)
            Log.d("SignUp Failed", t.toString())
        }
    })
}
fun signUp에 SignUpLoading(), SignUpSuccess(), SignUpFailure()(인터페이스 SignUpView의 메서드들) 들을 호출한다는 것은 곧
->SignupActivity에 구현한 그 세가지 메서드들을 실행시키는 것이다.
6-2. SignupActivity에서 인터페이스 메서드 실제 구현
6-2-1. fun SignUpLoading 구현
로딩시에 로딩 진행바가 움직이는 애니메이션이 나타나도록 구현해주거나 할 것이고,
6-2-2. SignUpSuccess구현
override fun SignUpSuccess() {
    Toast.makeText(this, "회원가입에 성공했습니다. 해당 계정으로 로그인 해주세요.", Toast.LENGTH_LONG).show()
    onBackPressed() // 로그인 화면으로 다시 나감
}
회원가입에 성공했다는 toast 메시지와 함께 onBackPressed() 함수를 호출하여 현재의 SignupActivity를 종료하고 이전의 LoginActivity로 돌아가도록 한다.
6-2-3. fun SignUpFailure 구현
SignupFailure는 실패 경우가 두가지이므로(중복 회원가입, 공백 입력) 경우의 수를 나눠주자.
먼저 인터페이스의 fun SignUpFailure 부분을 다음과 같이 수정해준다.
// 인터페이스 SignUpView.kt에서
fun SignUpFailure(code: Int, msg : String)
응답에 따라 달라지는 code와 msg 를 받아오도록 한다.
그리고 AuthService.kt 에서 그에 맞게 인자를 전달한다.
// AuthService.kt 의 fun onResponse에서
when (resp!!.code) {
                    201 -> signUpView.SignUpSuccess()
                    else -> signUpView.SignUpFailure(resp.code, resp.message)
                }
그러면 SignupActivity에서는 다음과 같이 member를 implement하라고 빨간줄이 뜰것이다.
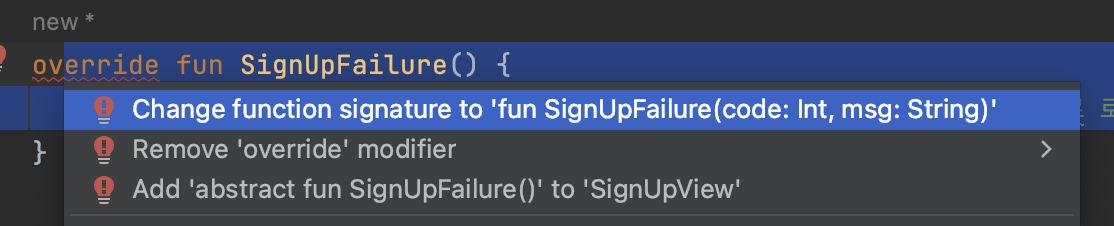
alt+enter/option+enter 로 하란대로 해주고
다음과같이 toast 메시지를 출력하는 구문까지 넣어서 완성해주자
override fun SignUpFailure(code: Int, msg: String) {
    Toast.makeText(this, "회원가입에 성공했습니다. 해당 계정으로 로그인 해주세요.", Toast.LENGTH_LONG).show()
}
이전 글까지 한꺼번에 요약하자면,
<Retrofit 사용 준비 단계>
1) 구글링으로 retrofit2 사용에 필요한 설정을 import 해준다.
이때 retrofit converter factory(데이터 클래스를 JSON 객체로 바꿔줌)도 함께 import 해야한다.
2) ApplicationClass 를 만들어서 전역 변수와 레트로핏에 필요한 3가지(builder, 인터페이스, data class) 중 하나인 builder 를 만든다.
이때 application class는 꼭 manifest 파일에 등록해야 한다.
3)인터페이스 만들기

api 명세서에 맞게 요청방식(@post), 내부에 포함할 데이터(@body) 그리고 반환받을 타입(Call<BaseResponse<SignUpResponse>>)을 전부 명시해준다.
4)data class 만들기 - AuthEntity.kt
4-1) request body를 담을 data class
@SerializedName 어노테이션을 사용하여 실제 통신에 사용될 키값(ex. "userId")과 개발코드에서 사용될 변수(ex. val userId : String)을 맵핑해준다.
4-2) response body를 담을 data class
이때 공통된 키값을 뼈대삼아 BaseResponse.kt라는 데이터 클래스를 만들어준다.
그리고 거기서 제너릭을 사용해서 BaseResponse<T> 를 Call 객체에 전달할 것이다.
여기서 T는 응답이 성공적일 때만 들어오는 데이터를 받을 것이다.
<Retrofit 로직 구현 단계>
1) 서비스 클래스인 AuthService.kt를 만든다. 여기에 응답을 어떻게 처리할지 실행로직을 정의한다.
2) 인터페이스를 상속받는 서비스 객체인 authService 객체를 생성한다.
3) 서비스 클래스 안에 함수를 생성하는데
3-1) 그 안에서 authService 객체로 인터페이스의 메서드를 호출하기 위한 변수들을 인자로 받도록 한다.
3-2) request 객체를 생성해서 id/pw/name 등의 필요한 정보들을 메서드에 전달한다.
3-3) enqueue()에 콜백 객체 object를 익명함수로 생성하면
3-4) 응답 성공/실패 시에 실행되는 함수들을 override 할 수 있다.
4) 로그인 액티비티와 회원가입 액티비티를 만든다
4-1) 로그인 액티비티에는 버튼 누르면 intent로 회원가입 액티비티로 이동할 수 있도록 구현한다.
4-2) 회원가입 액티비티에서는 id/pw/name 입력받아서 데이터바인딩으로 가져온다음 toString으로 파싱한다.
5) http 주소도 허용하도록 manifest 파일에 요청구문을 작성한다.
6) 뷰 담당 인터페이스 만들고 함수(로딩/회원가입성공/회원가입실패) 메서드 선언해주기
7) AuthService 서비스 클래스에 해당 인터페이스 상속받는 함수 만들고
7-1) 회원가입시에 가장먼저 로딩 메서드 호출
7-2) 응답의 code 값 따라 성공/실패 메서드 호출
8) 액티비티와 AuthService 연결
액티비티에서 받아온 정보를 AuthService의 실행로직에 전달하도록 한다.
8-1) 액티비티가 SignUpView (뷰담당인터페이스)를 상속받도록 한다.
이는 authService에 선언해놓은 메서드에 파라미터로 액티비티 자체를 넘겨주기 위함이다.
8-2) 액티비티에서 AuthService 클래스의 객체를 만들어준 다음 메서드를 호출해서 인자로 this(액티비티 자체)를 넘겨준다.
이렇게 하면 액티비티의 정보를 AuthService 안의 객체와 맵핑하면서 AuthService 안의 실행로직을 이용할 수 있게 된다.
8-3) 액티비티에서 로딩/성공/실패 메서드 구체적으로 구현하기
AuthService와 액티비티를 연결해놓았으므로 AuthService에서 이 메서드들을 호출하면 액티비티에 구현한 대로 메서드가 실행된다.
8-3-1)실패로직은 두개 이상이므로
뷰 담당 인터페이스에서 파라미터로 실패메서드는 code값과 message 값을 받도록 함->AuthService에서 그 메서드를 호출할 때 알맞는 인자를 전달하도록 함->액티비티에서도 해당 인자를 전달받게 한 다음 메서드 구현하기
목차로 간단히 remind
0. api 명세서 테스트
1. 서비스 클래스 만들기- AuthService.kt
1-1. authService 객체 만들기
1-2. 실행함수
❗️잠깐! 파일정리 겸 중간정리
2. Login Activity , 회원가입 Activity 만들어주기
3. xml 수정
4. manifest 수정
5. 응답 결과로 UI 그리기
5-1. 뷰 담당 인터페이스 SignUpView
5-1-1. 파일 만들기
5-1-2. 인터페이스에 함수 선언
5-2. AuthService.kt 에서 인터페이스 로직 구현
5-2-1. AuthService에서 인터페이스를 상속받는 함수를 만들어준다.
5-2-2. 로딩중 fun SignUpLoading
5-2-3. 로그인 성공시 fun SignUpSuccess/로그인 실패시 fun SignUpFailure()
6. 액티비티에서 받아온 정보를 AuthService.kt 에 연결
6-1. SignupActivity 수정 : 바인딩해온 정보를 AuthService의 로직에 전달할 수 있도록
6-2. SignupActivity에서 인터페이스 메서드 실제 구현
6-2-1. fun SignUpLoading 구현
6-2-2. SignUpSuccess구현
6-2-3. fun SignUpFailure 구현
다음 글에서는 이렇게 http 통신으로 로그인 함으로써 가져온 jwt 토큰을 어떻게 header(헤더)에 넣는 지에 대해 다룰 것이다.